Thursday, July 28, 2011

My Garden IS Growing

EIEIO! WOW! This Bathroomfarmer is pleased to report that my garden is growing. I spent time this afternoon rearranging the BathroomFarm and being generally pleased with the progress I am seeing. The seedlings I planted were in questionable shape from lack of light and cool temperatures while I was waiting for room renovations to be finished but most of them rebounded nicely and are growing like crazy!


I made a few changes on the wall. Because two more of the tomato plants did not thrive, I discarded them and planted carrot and radish seeds in their place. I have this idea to execute my projects with the phases of the moon in a farmer almanac-y kind of way, so I decided adding root veggies to the wall during the waning moon was a good move keeping with the folklore of farming.

I also compressed the farm into a smaller space to take better advantage of the light I designed. I want to stick to using upcycled food containers on the wall for awhile because this is the lowest skill and cost option. I want everyone to be able to achieve good results with indoor growing with minimum expense.

Some collard greens seedlings were planted upside down in a bottle on the left. The tomato plant originally in there was the first to die. It's better to plant the upside down plants in the bottle first, but I carefully inserted the little seedlings with the help of an ice tea spoon and I'm hoping for the best! The green pepper plant planted upside down next to it was in very bad shape when I planted it but is growing well now!

I tidied up the inside of my garden shed which
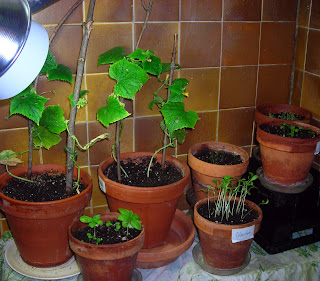
is second hand metal shelving covered with upcycled bedsheet. There were already two pots of cucumbers growing on top of it. I added some small terra cotta pots of herbs that I started on my window ledge next to my desk. I noticed when I water the plants in the milk cartons on the wall, the excess water drips through the holes punched into the bottoms directly onto the pots below! There is a south facing window next to the garden shed and I have had good results in the past growing houseplants here. I do have one of the floor lamp bulbs focused on this area, too.


The third growing area is the large pot on the floor in front of the wall with a right angle trellis made from an upcycled display easel behind it. Everything in this pot is doing well. The midget melons are ambitiously vining toward the wall. The tomato, green pepper, and lettuce plants are all growing. I sowed some more lettuce seeds in there and those are sprouting. I added just a few carrot seeds today to see how they would do.

The spinach and Swiss chard greens in the hanging basket by my ceiling light replaced with a grow bulb have also sprouted. I have a few new seeds started on the window ledge next to my desk. The collards were transplanted today, but the only other one that's sprouted is chili pepper. I will be starting new seeds with regularity because the idea
is to have a continuously producing garden. It's nice to be able to disregard the seasons. It's equally nice to garden in an airconditioned room, far away from the dreadful Indiana heat and humidity! I DO keep this room warmer than my bedroom adjoining it during the day but let it cool down a little during the nights. It seems to be working.

Tuesday, July 19, 2011

The Lay of the "Land" in the BathroomFarm


Because most seedlings rebounded nicely with light therapy, I decided to plant the first of my crops in the BathroomFarm and move forward with the sowing of the next seeds. This is just the beginning. Unlike many of my projects, that have a beginning and end, this will be perpetually in a state of evolution. In keeping the project very simple and low cost, I used common materials. The proceeds from my Quality Junk sale financed the purchase of potting soil from my neighborhood dollar store. I collected some sticks on the way home to use as plant supports.

The first containers I used to plant my BathroomFarm were containers I already had and some I made by upcycling food containers. It doesn't matter how pretty the wall looks in the beginning because as I add more
plants and everything grows, The foliage will obscure the containers. It was more important to start the project with what's on hand than to agonize over aesthetics at first. The biggest goal is to make a productive garden at the least expense.

The garden grows up along the whole wall using as much space as possible. I set two pots of cucumbers on top of my "garden shed" made from second hand shelves covered with upcycled bedsheet. I put sticks in the pots to keep the vines under control until they reach the wall and can grow up the twine I laced around nails. Upcycled milk cartons have tomatoes planted in them. There are peppers growing upside down and green onions and green beans planted in the tops of the large beverage containers on the lower left of the wall. A tomato plant that was planted upside down did die but I had suspected that I damaged it during transplanting. I certain of it now.


I have a lage pot on the floor on the left of the BathroomFarm. I upcycled a display easel by lacing twine around its legs to make a right angle trellis
for the Minnesota Midget Melons planted in it. I also planted green peppers, tomatoes, and heirloom lettuces in this pot. Because it's a very large container, I embedded a quart size bottle with the bottom cut out during planting. When I water this container, I fill the bottle to channel water into the lower part of the pot efficiently.

There are two other areas I am making use of for the BathroomFarm. I replaced the ceiling light bulb with a grow light and hung two baskets planted with spinach and Swiss chard leafy greens and suspended them next to the light fixture. There is a fan wired into the circuit which is on when the ceiling light is on so it gives a little extra ventilation in the Bathroomfarm which is good. I am also using the window ledge next to my desk as a seed starting area. I left the grow light in the clamp lamp that I suspended there for reviving my seedlings when I first started moving in. The next crops I planted are terra cotta pots with oregano, chives, parsley and cilantro. I also started yogurt cups with collards, zucchini and chilis!


So far the only problem encountered is that the lights are interfering with our cordless Internet phone! If I don't answer it right away, it's because I'm turning off the grow lights and lying to my crops about having a solar eclipse!

Thursday, July 14, 2011

Let There Be Light in the BathroomFarm!


The make or break point of the BathroomFarm is adequate artificial light for indoor vegetable growing. Although the bathroom has two large south facing windows the light is still inadequate because the room is also shaded by our carriage house next door and the many trees in the south yard. My first impression of lighting options made me think the project was going to be aborted before it had begun. There were no out of the box options that fit my needs:
  1. The equipment must be inexpensive to acquire. Most commercially available grow lights are designed for use in marijuana growing. In fact most of the lights are actually illustrated doing exactly that. Needless to say the prices of most lights are better suited to the budgets of persons growing crops worth thousands of dollars per pound as opposed to a few dollars per pound.
  2. The lights must be full spectrum. Plants use the wavelengths of light they need which varies depending on the stage of growth they are in. Early in their life, plants need light in the blue range to develop foliage and later want red spectrum light to facilitate fruiting. Most lights are either/or. Because the idea for the BathroomFarm is to have a continuously producing garden, I will need full spectrum all the time and the plants in various stages of their life cycles can get what they need. I am not planting a crop and harvesting the crop. I am planting/harvesting all of the time.
  3. The equipment must be simple. I just want to plug it in and turn it on. No extra this or that stuff like ballasts and inverters just yet. I have enough to learn about growing a garden without becoming an electrical engineer first.
  4. It has to use as little electricity as possible and produce as little heat as possible. The electricity part is a no-brainer because the path to sustainability is NOT through the obscene use of resources especially the natural ones. The heat part is for personal security because law enforcement regularly flies over cities looking for hot spots in buildings which indicate indoor growing rooms. In their narrow minds the only plants grown indoors are the illegal ones. This is especially important in Indiana where citizens have essentially lost the 4th Right and police can break down doors and come on in without warrant or probable cause! This BathroomFarmer is all about drama avoidance!
  5. The lights have to be suitable for vertical growing. They have to focus perfectly on the plants on the wall and not interfere with getting close enough to the wall to tend the crops.
  6. Because this was starting to look a lot like a do-it-myself project, I didn't want to buy any special tools or acquire any special skills to accomplish it.
The Gro-Lux bulbs pictured above (and listed for sale in my BathroomFarmer Shop in the sidebar) were ideal for the project. I was able to acquire all of the materials for about $90! I made this myself with few construction worker skills and no electrical skills. I designed my "floor lamp" which would focus on the wall and be easy to slide out of the way. My landlord took me to Home Depot on Post Road on the Eastside of Indianapolis. I took my June trip in a fossil carbon powered passenger vehicle to a hardware store as opposed to a grocery store. I want to say that my shopping experience was great there, too. A sales associate named Mike C. accompanied me around the store and helped me find exactly everything on the list I made from the Home Depot website. I was treated with a lot of respect and felt like my project deserved good attention even though it is a little unusual!


The first step was the hardest and the most hazardous. I set a 2 x 4 vertically in a bucket of Quikrete to make the base of the lamp. You HAVE to protect your eyes, mouth and nose, and hands when you use this material. I watched videos on the company website to learn how to use it first. I made the lamp inside of my Bathroom. I scooped the mix out of the bag to avoid dust and because I couldn't pick up the 80-pound bag! Going slowly, I mixed a small amount in the big bucket and put the board in. I used the edge of my desk to make sure it was straight. Then, in a small bucket I mixed little batches and filled the big bucket the
rest of the way up. I left it alone overnight and the Quikrete perfectly cured so I could move it. In addition to taking personal safety precautions while using Quikrete, be really really careful about the amount of water you add. The company videos will show you what it looks like when mixed properly. Doing little odd sized batches required making visual decisions! Adding too much water prevents the concrete from setting properly!

I had a Martha Stewart moment and painted the board white with leftover paint I already had. I then decided where to attach clamp lamps to best benefit the arrangement I
was planning for my BathroomFarm. The lamps are not evenly spaced because there are areas on top of the shelving and on the floor which are included in the garden plan. Where I decided to put the clamp lamps was based on covering the surface

area and making use of the 80 degree beam spread AND maximizing the 875 lumens per bulb output. All things considered, that's a LOT for just 20 Watts of energy per bulb and a life of 10,000 hours. There is really good information on the bulb box about intensity of light needed for different plants including vegetables. Studying the space and considering my plans for crops helped me decide how to space my lamps. Farming is a little bit intuitive and BathroomFarming is not different in that respect.


I tipped the board over and supported it on top of a handy space heater to attach the clamp lamps by securely nailing them into position. They clamped on just fine
but I wanted them EXTRA secure to avoid popping off when the lamp is bumped or moved. Those bulbs are too precious to accidentally break. The bulbs themselves have a reflector so the reflector on the clamp lamp is doing nothing other than providing a socket for the bulb. I bought the cheapest solution for the clamp lamp AND took a bulb to the store to make sure it worked before buying. Mike C.
at Home Depot was very cool about it as was the store itself allowing me to bring merchandise I owned inside!

The last step was to thread the cords through the little space between the board and each clamp (for neatness), screw in the bulbs and stand it up. I used one extension cord on each side and plugged them both into a third extension cord and plugged it in. When upright and ON, I could then shift the reflectors around to focus light where it was needed and distribute that light evenly to emulate direct sunshine.

Less than $100. Sweet. EIEIO!

Saturday, July 9, 2011

BathroomFarm 1.0: Preparation

My BathroomFarm started in November 2010 with an idea about growing a year-round vertical vegetable garden on a wall in my bathroom and has become a project with a life of its own. Since November, it has evolved into a global community with a presence on both Facebook and twitter. You are reading its first blog. There are also Tumblr blogs and a syndicated blog on thriftyandgreen.com in the works.

In review, it is not mysterious about why BathroomFarmer is so popular already. Many people are interested in growing their own food for quality and safety reasons. The idea of having fresh vegetables all year long is exciting. Being able to do this at a very low cost is even better!


I am going to briefly review here the major steps in getting to the point of planting my BathroomFarm. Although I read seed catalogs during the winter and was impressed with the infinite variety of specialty seeds for container growing, I decided on using mostly seeds commonly available at the grocery store. I did this because those seeds are available almost everywhere and they can be purchased with food stamps. Until now, vertical gardening has been luxury market priced. I want to make this option possible to anybody with a desire to do it regardless of their income level. For this reason, while planning the garden, I decided to make it mostly from upcycled and salvaged materials. As this project perpetuates in the future, I will add things more costly. For right now, I just want to prove it can be done for very little cash.

During April, I started seeds in toilet paper cores and dollar store dirt and put them on the
plant stand in the back hallway of the house to sprout. This was my only option since the room where the BathroomFarm would be was undergoing renovations because of serious water damage from a house fire several years ago. We had a rather cool and dreary spring. The seedlings did sprout but developed poorly because of lack of sunlight to warm the lead surface. By the time the weather took a turn for the better, the giant ginko tree outside the south windows, shaded the plant stand.


The make or break item for the BathroomFarmer project is the specialty lighting for indoor plant growing. I looked at thousands of options. Most indoor grow lights are designed to be suspended above a horizontal surface and are not appropriate for this project. Even if they were attached to the ceiling on one side and suspended in front of the wall, it would be difficult to approach the wall to tend the crops. Most of the lights are VERY expensive which is not surprising since the most common indoor growing operations are of the marijuana variety. The lighting I need for the BathroomFarm must be so economical, that it pays for itself with savings from food costs. Electrical costs also figured into this decision.

Since the lights are a significant expense, I had a FUNdraising Quality Junk sale to raise money for them to demonstrate that it is possible to accomplish the BathroomFarm even for persons with low income/no income. I sold things that I no longer want to obtain the things I need most. Lucky for me, I live in a neighborhood that does a group sale that 20,000 people come to each year. I want to emphasize that is my personal opportunity and everyone has some sort of opportunity if he truly wants to make a dream real. You have to be creative in your own way.


Assessing my budget after the yard sale, I settled on buying a quantity of these full-spectrum fluorescent bulbs I found on Amazon.com and designing an appropriate fixture for them which I needed to make myself from inexpensive and easy to obtain materials. I have listed these bulbs in the BathroomFarmer shop in the right sidebar. I was also able to acquire enough potting soil for the project from yard sale proceeds. The room was finished in mid-June and I have been moving into it ever since and assessing the situation. I am very fortunate to have a landlord who supports this project and, as a finishing touch to my space mounted parallel 2 x 4s on the wall and screwed a large sheet of particle board onto it! And painted it to match my walls! This gives me an easier to nail surface since the wall is plaster and tile behind it. It also keeps the plants away from the wall in the winter which gets cold because it's an exterior wall in an 1892 house.


Behold, the blank canvas soon to be my BathroomFarm! I will be posting more frequently at this point going forward during the physical build out of the vertical garden. It has taken longer than I had anticipated to actually plant the garden. That did bother me at first, but the indoor grow room is not subject to seasonal growing. My next blog post coming soon is about making the light fixture which I designed myself! It's not pretty, but I believe it will work perfectly for this space.