Showing posts with label indoor grow room. Show all posts

Thursday, July 28, 2011

My Garden IS Growing

EIEIO! WOW! This Bathroomfarmer is pleased to report that my garden is growing. I spent time this afternoon rearranging the BathroomFarm and being generally pleased with the progress I am seeing. The seedlings I planted were in questionable shape from lack of light and cool temperatures while I was waiting for room renovations to be finished but most of them rebounded nicely and are growing like crazy!


I made a few changes on the wall. Because two more of the tomato plants did not thrive, I discarded them and planted carrot and radish seeds in their place. I have this idea to execute my projects with the phases of the moon in a farmer almanac-y kind of way, so I decided adding root veggies to the wall during the waning moon was a good move keeping with the folklore of farming.

I also compressed the farm into a smaller space to take better advantage of the light I designed. I want to stick to using upcycled food containers on the wall for awhile because this is the lowest skill and cost option. I want everyone to be able to achieve good results with indoor growing with minimum expense.

Some collard greens seedlings were planted upside down in a bottle on the left. The tomato plant originally in there was the first to die. It's better to plant the upside down plants in the bottle first, but I carefully inserted the little seedlings with the help of an ice tea spoon and I'm hoping for the best! The green pepper plant planted upside down next to it was in very bad shape when I planted it but is growing well now!
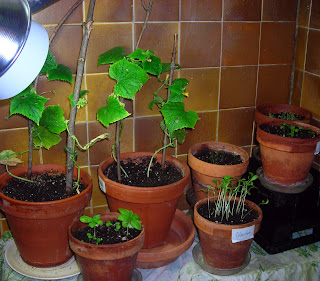
I tidied up the inside of my garden shed which
is second hand metal shelving covered with upcycled bedsheet. There were already two pots of cucumbers growing on top of it. I added some small terra cotta pots of herbs that I started on my window ledge next to my desk. I noticed when I water the plants in the milk cartons on the wall, the excess water drips through the holes punched into the bottoms directly onto the pots below! There is a south facing window next to the garden shed and I have had good results in the past growing houseplants here. I do have one of the floor lamp bulbs focused on this area, too.


The third growing area is the large pot on the floor in front of the wall with a right angle trellis made from an upcycled display easel behind it. Everything in this pot is doing well. The midget melons are ambitiously vining toward the wall. The tomato, green pepper, and lettuce plants are all growing. I sowed some more lettuce seeds in there and those are sprouting. I added just a few carrot seeds today to see how they would do.

The spinach and Swiss chard greens in the hanging basket by my ceiling light replaced with a grow bulb have also sprouted. I have a few new seeds started on the window ledge next to my desk. The collards were transplanted today, but the only other one that's sprouted is chili pepper. I will be starting new seeds with regularity because the idea
is to have a continuously producing garden. It's nice to be able to disregard the seasons. It's equally nice to garden in an airconditioned room, far away from the dreadful Indiana heat and humidity! I DO keep this room warmer than my bedroom adjoining it during the day but let it cool down a little during the nights. It seems to be working.

Tuesday, July 19, 2011

The Lay of the "Land" in the BathroomFarm


Because most seedlings rebounded nicely with light therapy, I decided to plant the first of my crops in the BathroomFarm and move forward with the sowing of the next seeds. This is just the beginning. Unlike many of my projects, that have a beginning and end, this will be perpetually in a state of evolution. In keeping the project very simple and low cost, I used common materials. The proceeds from my Quality Junk sale financed the purchase of potting soil from my neighborhood dollar store. I collected some sticks on the way home to use as plant supports.

The first containers I used to plant my BathroomFarm were containers I already had and some I made by upcycling food containers. It doesn't matter how pretty the wall looks in the beginning because as I add more
plants and everything grows, The foliage will obscure the containers. It was more important to start the project with what's on hand than to agonize over aesthetics at first. The biggest goal is to make a productive garden at the least expense.

The garden grows up along the whole wall using as much space as possible. I set two pots of cucumbers on top of my "garden shed" made from second hand shelves covered with upcycled bedsheet. I put sticks in the pots to keep the vines under control until they reach the wall and can grow up the twine I laced around nails. Upcycled milk cartons have tomatoes planted in them. There are peppers growing upside down and green onions and green beans planted in the tops of the large beverage containers on the lower left of the wall. A tomato plant that was planted upside down did die but I had suspected that I damaged it during transplanting. I certain of it now.


I have a lage pot on the floor on the left of the BathroomFarm. I upcycled a display easel by lacing twine around its legs to make a right angle trellis
for the Minnesota Midget Melons planted in it. I also planted green peppers, tomatoes, and heirloom lettuces in this pot. Because it's a very large container, I embedded a quart size bottle with the bottom cut out during planting. When I water this container, I fill the bottle to channel water into the lower part of the pot efficiently.

There are two other areas I am making use of for the BathroomFarm. I replaced the ceiling light bulb with a grow light and hung two baskets planted with spinach and Swiss chard leafy greens and suspended them next to the light fixture. There is a fan wired into the circuit which is on when the ceiling light is on so it gives a little extra ventilation in the Bathroomfarm which is good. I am also using the window ledge next to my desk as a seed starting area. I left the grow light in the clamp lamp that I suspended there for reviving my seedlings when I first started moving in. The next crops I planted are terra cotta pots with oregano, chives, parsley and cilantro. I also started yogurt cups with collards, zucchini and chilis!


So far the only problem encountered is that the lights are interfering with our cordless Internet phone! If I don't answer it right away, it's because I'm turning off the grow lights and lying to my crops about having a solar eclipse!

Saturday, July 9, 2011

BathroomFarm 1.0: Preparation

My BathroomFarm started in November 2010 with an idea about growing a year-round vertical vegetable garden on a wall in my bathroom and has become a project with a life of its own. Since November, it has evolved into a global community with a presence on both Facebook and twitter. You are reading its first blog. There are also Tumblr blogs and a syndicated blog on thriftyandgreen.com in the works.

In review, it is not mysterious about why BathroomFarmer is so popular already. Many people are interested in growing their own food for quality and safety reasons. The idea of having fresh vegetables all year long is exciting. Being able to do this at a very low cost is even better!


I am going to briefly review here the major steps in getting to the point of planting my BathroomFarm. Although I read seed catalogs during the winter and was impressed with the infinite variety of specialty seeds for container growing, I decided on using mostly seeds commonly available at the grocery store. I did this because those seeds are available almost everywhere and they can be purchased with food stamps. Until now, vertical gardening has been luxury market priced. I want to make this option possible to anybody with a desire to do it regardless of their income level. For this reason, while planning the garden, I decided to make it mostly from upcycled and salvaged materials. As this project perpetuates in the future, I will add things more costly. For right now, I just want to prove it can be done for very little cash.

During April, I started seeds in toilet paper cores and dollar store dirt and put them on the
plant stand in the back hallway of the house to sprout. This was my only option since the room where the BathroomFarm would be was undergoing renovations because of serious water damage from a house fire several years ago. We had a rather cool and dreary spring. The seedlings did sprout but developed poorly because of lack of sunlight to warm the lead surface. By the time the weather took a turn for the better, the giant ginko tree outside the south windows, shaded the plant stand.


The make or break item for the BathroomFarmer project is the specialty lighting for indoor plant growing. I looked at thousands of options. Most indoor grow lights are designed to be suspended above a horizontal surface and are not appropriate for this project. Even if they were attached to the ceiling on one side and suspended in front of the wall, it would be difficult to approach the wall to tend the crops. Most of the lights are VERY expensive which is not surprising since the most common indoor growing operations are of the marijuana variety. The lighting I need for the BathroomFarm must be so economical, that it pays for itself with savings from food costs. Electrical costs also figured into this decision.

Since the lights are a significant expense, I had a FUNdraising Quality Junk sale to raise money for them to demonstrate that it is possible to accomplish the BathroomFarm even for persons with low income/no income. I sold things that I no longer want to obtain the things I need most. Lucky for me, I live in a neighborhood that does a group sale that 20,000 people come to each year. I want to emphasize that is my personal opportunity and everyone has some sort of opportunity if he truly wants to make a dream real. You have to be creative in your own way.


Assessing my budget after the yard sale, I settled on buying a quantity of these full-spectrum fluorescent bulbs I found on Amazon.com and designing an appropriate fixture for them which I needed to make myself from inexpensive and easy to obtain materials. I have listed these bulbs in the BathroomFarmer shop in the right sidebar. I was also able to acquire enough potting soil for the project from yard sale proceeds. The room was finished in mid-June and I have been moving into it ever since and assessing the situation. I am very fortunate to have a landlord who supports this project and, as a finishing touch to my space mounted parallel 2 x 4s on the wall and screwed a large sheet of particle board onto it! And painted it to match my walls! This gives me an easier to nail surface since the wall is plaster and tile behind it. It also keeps the plants away from the wall in the winter which gets cold because it's an exterior wall in an 1892 house.


Behold, the blank canvas soon to be my BathroomFarm! I will be posting more frequently at this point going forward during the physical build out of the vertical garden. It has taken longer than I had anticipated to actually plant the garden. That did bother me at first, but the indoor grow room is not subject to seasonal growing. My next blog post coming soon is about making the light fixture which I designed myself! It's not pretty, but I believe it will work perfectly for this space.